How to setup TailwindCSS with PayloadCMS and Webpack
Everybody loves TailwindCSS so why not set it up for your React components in Payload? We're going to cover this exact setup with two compile options via the CLI and via a webpack extension.
Setup
Without further hesitation, let's install the dependencies
1yarn add -D tailwindcss autoprefixer css-loader postcss postcss-loader
Initiate your tailwind config file, this function will generate the tailwind.config.js file. In our example we've mapped a custom colour variable to one of Payload's CSS variables, you could do this for all of them so that you have a consistent set of styles in your components.
1yarn tailwindcss init
1// add the contents for your components to be recognised by tailwind2// your config file should look like this34/** @type {import('tailwindcss').Config} */5module.exports = {6 content: ['./src/**/*.{tsx,ts}'],7 theme: {8 extend: {9 colors: {10 // we've added our own colour that maps to Payload's css variable so we can re-use the same theme styling!11 error: 'var(--theme-error-400)',12 },13 },14 },15 plugins: [],16}17
Now create a tailwind.css file in the root directory so we can use the Tailwind directives
1// tailwind.css23// Don't import tailwind's base to avoid potential conflicts with reset styles4// @tailwind base;5@tailwind components;6@tailwind utilities;7
Add our React components
We're going to create a simple React component and inject it to our Payload admin interface so we can test our Tailwind classes in /src/components/NavigationAlert.tsx
1// ./src/components/NavigationAlert.tsx23import React from 'react'45const NavigationAlert: React.FC = () => {6 return <div className='py-6 border-slate-100 border-2 border-solid w-full bg-error text-black font-bold text-center'>Alert</div>7}8export default NavigationAlert9
This will compile your stylesheet that you can import into your admin panel in /src/css based on your React component. You can add it to a script in your package.json and then run it separately every time
1import NavigationAlert from './components/NavigationAlert'23// ... payload config4 components: {5 afterNavLinks: [NavigationAlert],6 },7// ...
Compile with the CLI
Now you can compile your stylesheet and we're going to do that using the CLI provided by tailwindcss
1yarn tailwindcss -i ./tailwind.css -o ./src/css/tailwind.css --watch
This command will compile your stylesheet that you can import into your admin panel in /src/css based on your React component.
You can add it to your package.json scripts so you can run it more easily as well
1// ... package.json : scripts23"tailwind": "tailwindcss -i ./tailwind.css -o ./src/css/compiledTailwind.css --watch",
1yarn tailwind
Now you just need to import the compiled CSS file into your admin
1// payload.config.js23// ...45admin: {6 css: path.resolve(__dirname, './css/compiledTailwind.css'),7}89// ...
Now you should see your component's styles applied.
Compile with Webpack
However, the CLI method isn't the most developer friendly approach as you have to remember to run a separate command. So let's integrate this step directly into our Payload configuration and we'll start by adding our postcss configuration and using those previously installed node modules
1// ./postcss.config.js23module.exports = {4 plugins: {5 tailwindcss: {},6 autoprefixer: {},7 },8}9
Add webpack configuration
We're going to extend Payload's webpack implementation to compile our Tailwind files as well, one thing to note is that the naming of our css rule test is intentionally unique so that it doesn't interfere with Payload's files
1// payload.config.js23// import our tailwind configuration file at the very top4import '../tailwind.css'56// ...78admin: {9 webpack: (config) => {10 return {11 ...config,12 module: {13 ...config.module,14 rules: [15 ...config.module.rules,16 {17 test: /\tailwind.css$/i,18 use: ['css-loader', 'postcss-loader'],19 },20 ],21 },22 }23 },24}25// ...
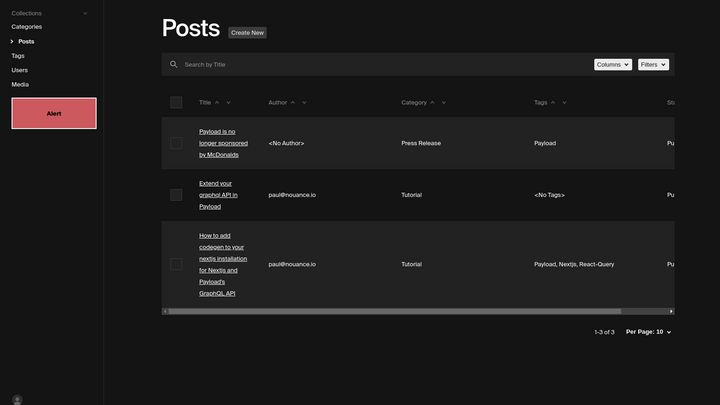
And now it should automatically compile and work with Tailwind's classes. Here's our ugly NavigationAlert component in action, using Payload's red colour

Please consult the example repository to get a better understanding of how all of this code works together and consider giving us a shout out on Twitter if you found this helpful!